3 Tools To Get Your Data Into Salesforce NPSP
Disclaimer: This post may contain affiliate links. These links, if used and purchases made, we may earn a small commission. These affiliate programs do not impact the recommendations we make or the resources we refer you to. Our focus is on providing you the best resources for your nonprofit journey.
You’ve heard about the power of the Salesforce NonProfit Success Pack (NPSP) as a constituent relationship management (CRM) and fundraising tool, but have you found yourself wondering how on earth to get your data into Salesforce?Well, wonder no more! The good news is that there are three primary methods for getting your data into Salesforce NPSP. One way is the NonProfit Success Pack Data Importer, which will take care of most of what you need. And if it doesn’t do everything you want or expect, then you can use the Gift Entry Tool to enter in all those pesky manual gifts. For the most peculiar of circumstances, a qualified admin can use the Salesforce Data Loader on both Windows and macOS.
There are three common ways to get nonprofit data into Salesforce NPSP. The tools most used are: Gift Entry Tool for bulk entry of donations; NPSP Data Importer for gifts, accounts, and contacts; Salesforce Data Loader for the widest variety of options to import and export all standard and custom object types.
Let’s look briefly into each of these below.
What Is The Salesforce NPSP Data Importer?
The Data Importer is a tool within Salesforce that allows users to import data from an existing program (like ACT!, HubSpot, MS Dynamics, RaiseDonors, MailChimp) directly into NPSP. It’s very important to understand how the importer works and what it does in order to be able to take full advantage of it.
The Data Importer uses a step-by-step wizard to walk you through the process of uploaded data from a .csv file into a custom object called NPSP Data Import. Think of the NPSP Data Import custom objects as a staging area or holding tank for data you want to import into contacts, accounts, opportunities, and related records.
Once the data is loaded into the NPSP Data Import object, it can be reviewed, test imports run, and then final import to NPSP run so that the corresponding account, contact, and opportunity records are created.
So, this is a two-step process. First, import your data into the NPSP Data Import custom object. Then, do the import into NPSP to actually create NPSP records. Get data into the staging area and then when you’re ready, create the actual records in NPSP.
It may sound confusing but it actually is fairly straightforward after you’ve done it a few times.
PRO TIP: Learn and test data imports in a Sandbox or Trailhead environment before doing it on your production Salesforce org. Nobody wants to loose data or worse yet, change it without a backup.
Why Use The NPSP Data Importer?
The Data Importer is a great choice for nonprofit users who are looking to use NPSP in their fundraising, or even just basic constituent management. There are many reasons why you might like the Data Importer, including:
- It is fast and efficient; it uses data directly extracted from your external applications. Export a CSV file, edit, then load.
- It knows the NPSP schema; when adding a new gift record it will automatically create or update any related records, like contacts and households, all in one pass.
- It has a built-in verification step, which means you can review data before it is imported into NPSP. This allows users to correct errors on the spot or decide whether to import the file at all.
- It saves time and effort – rather than manually importing from your external program (i.e. RaiseDonors), or risking user error by running too much manual updating, the Data Importer is a one-step solution to importing the data you need.
What Does The NPSP Data Importer Look Like?
When you launch the NPSP Data Import application from the App Launcher, you will then end up on the Import Tool page which is a list of import records. This is where things get interesting since here is where you can choose to import data as a whole or by one object.
Remember that Data Loader uses custom Salesforce objects as a holding pen for data you want to import into Salesforce.
The interface for Data Importer looks much like a grid of imported data records contained in the “holding pen” or staging area. Each row is a record to potentially import.
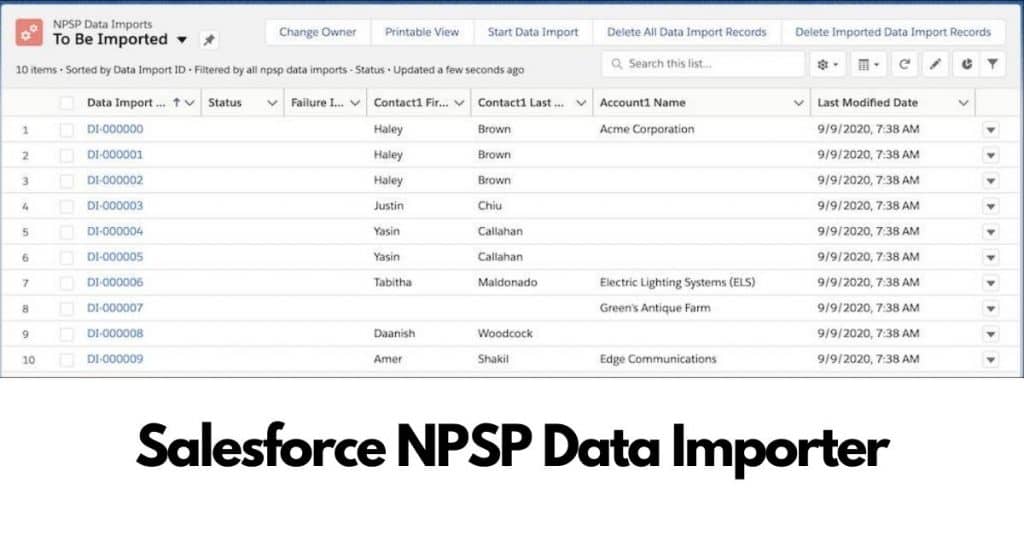
Like all grids in Salesforce, you can select specific rows to take action on, select all rows, or even edit individuals fields on individual rows.
This last feature, in-line editing, is really nice when testing an import, called a Dry-Run, and you have a data issue. Just go to the offending record, correct the data and try again. All of this is done while in the Salesforce application that you are already comfortable with.
How To Get Data Into Salesforce NPSP Data Importer?
To get data into Salesforce NPSP Data Importer, you need to export your data from your external system and then edit it. If using RaiseDonors as a source program, here’s what you need to do:
- Export the data from your non-Salesforce system in CSV format (the most common spreadsheet application)
- Clean and prepare your data for import: Use the NPSP Data Importer template, which mirrors the fields in the NPSP Data Import custom object.
- Import your data into NPSP Data Import object: You need to use an application to import your CSV data into the NPSP Data Import object. You can use the Salesforce Data Import Wizard or an external application. The first part of this two-part process is to upload your data with either the Salesforce Data Loader, Apsona, Jitterbit, DemandTools, and
- Set Up Matching Rules and Do a Dry Run: If you are about to upload records and want to see if they match any in your other records, you can do a dry run. The dry run is like the import process, but it does not actually import anything. This will help reduce duplicates from appearing in your other records and will help you avoid updating an existing record with incorrect data. Reference: Batch Import Overview.
- Do the Import Into NPSP: Now it’s time for the second part of the import process. Start the NPSP Data Import tool. It takes data from the custom object and makes multiple objects with it inside of the Nonprofit Success Pack, including Contacts, Accounts, and donations (Opportunities).
- Remove Imported Records: After you have imported the data into NPSP, you can delete the intermediate data in the Data Importer custom object to save storage. Remember, there is a cost to storage after you hit the limit of the free NPSP licenses.
What If The Data Importer Can’t Do Everything I Need?
If the Data Importer doesn’t work for your needs for data import, don’t worry! That just means it won’t be able to handle your particular situation. You can still use other data import methods to load data into standard and custom objects in Salesforce.
The most widely known tool is Data Loader. Created by Salesforce, this tool is freely available for use, however, it doesn’t know anything special about the Salesforce NonProfit Success Pack and the custom objects we nonprofits use. You’ll be working on one object type at a time and needing to reference internal record keys between objects.
This is where a Salesforce consultant or full-time administrator will come in handy.
As an example of this difficulty, let’s imagine you use a third-party software system (say, iDonate) for your online donations, and you would like to import this data directly into NPSP without direct Salesforce integration.
You might be tempted to simply load the records one by one through Data Loader in Salesforce. But remember, if we try to add a donation without first adding the iDonate account and contact records to NPSP, we will get an error.
So now you’ll need another step in your data import process – one of linking records together. This would be done from the Contact and Account objects in Salesforce followed by linking donation object records.
We recommend trying the NPSP Data Import tool first before going down the rabbit hole with Data Loader or third-party import tools since it can create and link related records in NPSP in one step.
What Is The Salesforce NPSP Gift Entry tool?
We’ve mentioned it before, but let’s take a closer look at Gift Entry.
Gift Entry is a process for managing both incoming gifts using batch data entry tools within the Salesforce NPSP app. Gift Entry in the NPSP is a specific tool for manually entering a batch of gifts at a single time.
This might sound like Data Importer, however, it has several key differences:
- Data Importer will import data into NPSP from outside sources. Gift Entry is a user entering gifts into Salesforce manually.
- Gift Entry will handle all inbound gifts (both online and offline donations) as well as staff-entered gifts.
- In order for your organization to use Gift Entry, you must have an email collection system set up to connect with NPSP.
Gift Entry is a complex process and frequently requires the help of a Salesforce NPSP administrator or a third-party consultant to walk you through using the process.
Though it may be more work, we recommend going with Gift Entry if it’s feasible for your organization. That way you don’t have to worry about other systems that could connect to NPSP independently of Salesforce.
Why Use The Nonprofit Cloud Gift Entry Tool?
Similar to Data Importer, the Gift Entry tool is a free app in the Salesforce NPSP. Gift Entry is intended to handle the entire inbound gift process, both online and offline donations. The Gift Entry app helps your organization in four ways:
- Fast Donation Entry – Donations are entered manually using a grid, spreadsheet-like, tool. This means your team can enter batches of donations without using a mouse. Just type and go.
- Smart Duplicate Record Prevention – Gift Entry validates all information against other records in your system to ensure you don’t enter non-duplicate records. Prevent duplicate people records by searching for existing Accounts or Contacts and associate each donation with the right person or account. If no such contact exists, simply create a new contact right within the tool.
- Advanced Donation Matching – Gift Entry has advanced logic to match records based on fields like name, address, and email. This can fix a lot of duplicate errors before they happen.
- One Technology Platform – Your gift entry team only needs to know one technology platform, Salesforce. Focus on getting those donations entered accurately, not having to remember what platform does what and how it works.
Note: Don’t get confused between the Batch Gift Entry (BGE) tool and the Gift Entry tool. Batch Gift Entry was the previous tool that was retired on July 31, 2021. Gift Entry is the new tool to use. Be sure you are reading articles about the new tool and not the old.
Gift Entry Process Overview
Ok, picture this. Betty Boop has a stack of donation cards in front of her. Each card has a check attached to it. Betty has already added up the total of all the checks in the stack, twice, and knows the total of the donations.
Now, it’s time to actually use the gift entry tool process!
Here is a high-level overview of what will happen:
- Create a new Batch and give it a name.
- Enter the total number of donations you will be recording in the batch.
- Enter the total amount of all gifts in the batch.
- Save the batch.
- Begin entering donations into the grid.
- Add contacts and accounts as needed.
- Existing opportunities that this gift may be a match for will prompt you.
- Repeat steps 5-8 for all donations.
- If the total number of donations and the total amount of donations entered match the totals in steps 2&3, now you can import the gifts into NPSP.
- This creates the proper opportunity and payment records linked to the correct accounts and contacts.
Boom! Done.
What is the Salesforce Data Loader?
The final tool to discuss is the Salesforce Data Loader. When we talk about Data Loader, an important distinction is that it can both import data to, but also export data from Salesforce too. The Data Loader is a free download that runs on Windows 10 and MacOs
It is the most flexible way for organizations to enter gift information, or bulk create leads, accounts, and contacts. Additionally, it is a powerful tool that can help you do bulk updates easily if you know what you are doing.
Those bulk updates might include donor addresses, NPSP donor levels, account assignments and much more.
Some of the benefits of using Data Loader are:
- Not only can you import records, but also export them. This is huge when it comes to exporting records, changing them in the CSV, and then imported the updated values.
- You have the ability to map columns from fields in your CSV to fields in the target object in Salesforce. No more having to moves values into a column with the Object field name.
- Mappings can be saved and re-used. This allows you to create a mapping for a regularly generated CSV and simply re-run the import using Data Loader with a saved mapping. This is a huge time saver for repeat imports.
- You can import data from any source into any object in Salesforce, including custom objects and fields.
One disadvantage is that Data Loader can be a complex tool and really requires a Salesforce Admin to understand best practices for data protection as well as Salesforce data object schemas and links.
Data Importer vs. NPSP Gift Entry vs. Data Loader, Which Is Better?
We recommend the NPSP Data Import tool for nonprofits that want to get started quickly with bulk data imports and don’t have a technical Salesforce technical administrator.
For most organizations, this is the quickest and easiest way to get their data into the system.
Salesforce has good information on how to use Data Importer. Start with the Import Your Data Using NPSP Data Importer trail on Trailhead.
On the other hand, we highly recommend using NPSP Gift Entry if your donor data comes from multiple sources such as emails, websites, online campaigns and have staff manually enter the gifts.
The most common scenario that makes Gift Entry the perfect tool is when your finance department is responsible for entering gifts into Salesforce. You don’t need these staff to be technical experts. Simply learning how to batch gift entry is all they need, safe, simple, and able to be reconciled.
Finally, Data Loader is best in the hands of a technical Salesforce administrator. You’ll be able to make copies of records for offline storage, export lists and records, import new records, and even update existing records. This is the tool for you.
Yes, there are 3rd party tools available for a fee that can help with data imports, but we think these are only needed in very specific cases and large organizations. Until then, stick to Data Importer, Gift Entry, and Data Loader.
What Third-Party Tools Can Be Used To Import Salesforce NPSP data?
Cloud Tools for Salesforce offers data import tools that are available with a paid subscription.
- Direct Import is a tool for Groove users that can be used to map columns in a CSV file to fields in an existing or custom object, which can include additional NPSP objects such as contacts, accounts, events, and transactions. The free version will only allow you to upload up to 10 rows at once.
- DemandTools: a Web-based data integration tool that supports connections to multiple CRMs and databases.
- Apsona: a powerful platform for data integration and eCommerce.
Related Questions
How much does the Salesforce Data Importer for NPSP cost? The NPSP Data Importer is included with the NPSP package. There are no additional costs beyond your standard Salesforce user licensing.
Are there any known issues with NPSP Data Import? Yes, in the CSV template, delete any columns you are not using for the import. NPSP Data Import has trouble when over 65 columns are present in the import file.
Should we use the Data Importer or Gift Entry? If you are processing under 100 gifts per week, Gift Entry might be the best use of time and resources. Over 100 online donations per week and you should look at Salesforce integration or using saved mapping in Data Loader with a standard export from your online donation platform.
What are the benefits of switching to Data Importer from a manual process? The two largest benefits of using Data Importer are reduced errors from manual entry and time savings of staff.
Can I update addresses using Data Loader for Salesforce? Yes, you can. Just be sure you already have a solid handle on NPSP Address Management.
Conclusion
Getting your data into Salesforce NPSP is a requirement in most nonprofits. Whether it is a one-time import or an ongoing process, there are free tools to help you manage your data for contacts, accounts, and gifts quickly and easily.
Data Importer is a fast way for nonprofits to get started with the reporting and/or CRM side of NPSP. Data Importer should be used when your nonprofit has a technical Salesforce technical administrator. If you’re not sure if your data will import without error, it’s best to use Data Importer.
Gift Entry is the best tool for organizations that have their donor data coming from multiple sources such as emails, websites, online campaigns. Gift Entry also works well with finance departments who don’t need to be technical experts to enter data into Salesforce.
If you want more power in your data imports, Data Loader is the tool for you because of its ability to copy records offline, update existing records, and export lists.
Data can be imported into any object in Salesforce, including custom objects and fields such as NPSP contacts.

