The Benefits of Salesforce NPSP Address Management and How to Use it
Disclaimer: This post may contain affiliate links. These links, if used and purchases made, we may earn a small commission. These affiliate programs do not impact the recommendations we make or the resources we refer you to. Our focus is on providing you the best resources for your nonprofit journey.
Address management is a vital part of any business, and the Salesforce NPSP platform makes it easier than ever. In this article, we will discuss how to use the features for address management that are available in the NonProfit Success Pack. You will learn about best practices for managing your addresses within NPSP, and you’ll see just how much time and money you can save by using these features properly. Ready? Let’s get started!If you’re like most nonprofit organizations, addressing is a major time commitment. You need to verify that the address provided matches what’s in your database while adding new addresses as contacts are added or if households move.
You also must ensure each household has one primary and up to three alternate addresses for special occasions – such as when mailings go out during different seasons of the year. And if there’s an update on any contact information (such as name change), it needs to be updated throughout all records with matching data fields: both accounts and households. This process can take hours!
The good news? The Salesforce NPSP platform provides features for managing mailing and physical addresses so you can focus on the more important aspects of your job.
What is Salesforce NPSP Address Management?
The Salesforce NPSP platform includes some great features for importing data and managing addresses. NPSP address management is the management of mailing and physical addresses for contacts, households, and organizations throughout the record’s lifecycle.
In the NPSP managing addresses includes the ability to:
- Record multiple active addresses of varying types
- Verify addresses with the postal system
- Maintain historical addresses
- Manage seasonal addresses
- Update address changes across records
How can good address management help your nonprofit?
Maintaining good address data hygiene provides several benefits to nonprofits, including reduced staff time and reduced postage costs. Both of these benefits increase the stewardship of nonprofit resources.
To gain the full benefits of proper address management, it should be done as part of your existing CRM needs. Staff time is significantly reduced when large mailings need to occur because they no longer have to manually manage addresses since the addresses have already been validated and maintained.
When accounts are updated in bulk with clean data, postage costs decrease as well. Mailing lists can be zipcode sorted for first-class mailings to reduce costs further. Lastly, when the number of undeliverable pieces is reduced, more accurate print orders will reduce expenses and increase the ROI of any mailing campaign.
The bottom line is that good address management provides nonprofits with an opportunity to save time and money while making it easier for staff to use their resources more effectively.
In addition to providing all of these benefits, Maintaining accurate records also makes reporting much simpler when individual households or organizations need financial reports based on location demographics which can improve fundraising and marketing analysis.
How to configure Salesforce NPSP address management settings
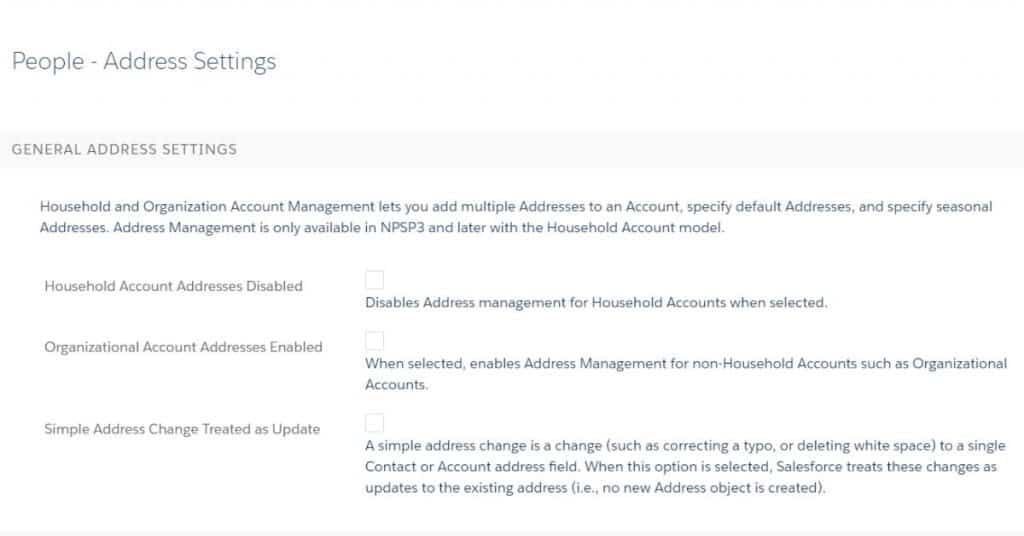
Household address management is turned ON by default in Salesforce NPSP. This means that the ability to maintain multiple addresses, retain address history, and use seasonal addresses is already available.
Organization address management is turned OFF by default in NPSP. To enable Organizational account address management, you will need to enable the setting.
To enable Organizational Account address management:
- From App Launcher select NPSP Settings –> People –> Addresses
- Click Edit
- Check the Organizational Account Addresses Enabled checkbox
- Click Save
Now that address management features have been added to Organizational Accounts, you still will not see them when viewing individual Organizational Accounts. This is because the Addresses related list is not included in the Organizational Accounts page layout.

How do NPSP automatic address updates work?
Address updates in Salesforce NPSP are designated as simple or complex address changes.
A simple change is a small correction to a mailing address, such as correct an address road name from “123 Maple” to “123 Maple St.”
By default, the NPSP is configured so that simple address changes update the address record you are editing. On the other hand, complex address changes, such as a complete address change, create an entirely new address record, retain the previous address separate from the new address. This ensures you do not lose historical addresses.
If you want to make even simple address changes create new address records, you can change the default behavior. To do this:
- From App Launcher select NPSP Settings –> People –> Addresses
- Click Edit
- Uncheck the Simple Address Change Treated as Update checkbox
- Click Save
What is address verification in Salesforce NPSP?
In the Salesforce NPSP, address verification is a feature for ensuring addresses are complete and up-to-date. There are two types of address verification: manually verified (manual) or automatically verified (automatic).
Manually Verified means that you will need to perform an additional step before saving your records to verify their accuracy. After verifying the new record as accurate, click “Save” on any page where it’s available – such as Address Details pages, Contact Detail Pages or Lead Detail Pages – then all future saves of this individual contact/lead will be updated with the newly verified information.
Automatic verification is done by automation, so no manual steps are necessary. All edits made after enabling automatic verification will have a checkmark by them, and when you click “Save” on any page where it’s available – such as Address Details pages or Contact Detail Pages – all future saves of this individual contact/lead will be updated with the newly verified information
Automatic verification is recommended for most users because it is more accurate.
How to setup automatic address verification in Salesforce NPSP
Automatic address verification is a great feature for organizations as it helps address data hygiene without requiring much user effort.
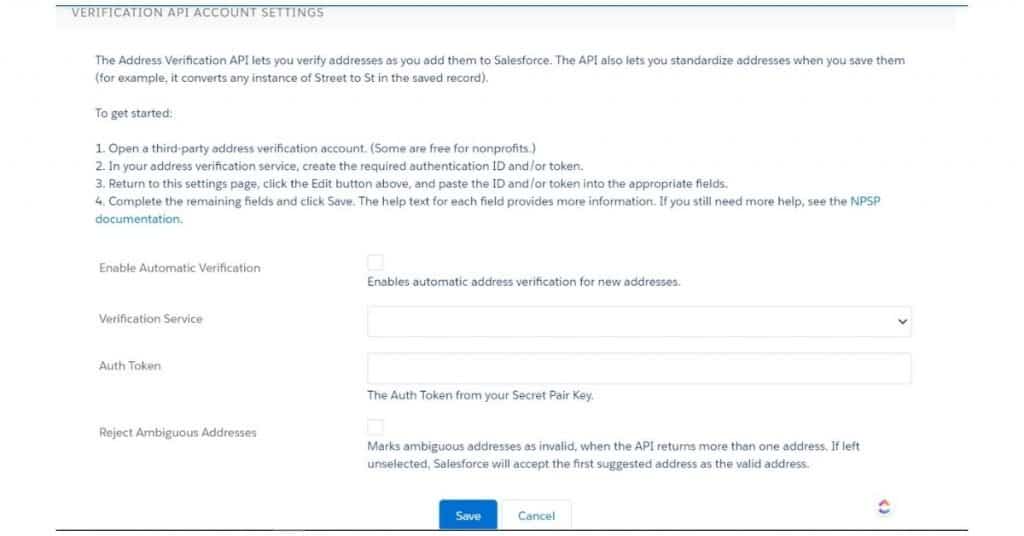
In NPSP, the automated address verification requires you to have a subscription/account with a third-party address verification service. Salesforce NPSP currently supports three address verification services, Smarty Streets API (US Only), Cicero API, and Google Geocoding API.
How to set up automatic address updates:
- From App Launcher select NPSP Settings –> People –> Addresses
- Click Edit
- Click Enable Automatic Verification under the Verification API Account Settings section
- Select the address verification service you want to use. Complete the service-specific details
- Click Save
- Optionally if using SmartyStreets API, to run bulk address verifications on all addresses currently in your NPSP instance, click the Verify All Addresses button
It is important to note that by default, if more than one address is returned by the address verification service API, Salesforce will select and use the first one suggested. If instead, you want to mark any addresses that return more than one suggestion as a invalid address, there is a setting for that.
- From App Launcher select NPSP Settings –> People –> Addresses
- Click Edit
- Select Reject Ambiguous Addresses
- Click Save

How do I add seasonal addresses for NPSP households or contacts?
Adding a seasonal address to an account is very much like adding any other addresses. The primary difference is that you will also specify a start month/day and an end month/day to use the seasonal address.
To create a new seasonal address for an account:
- Create a new Address for the Household or Organization Account
- On the Address Edit page, enter the Seasonal Information: Seasonal Start Month, Seasonal Start Day, Seasonal End Month, and Seasonal End Day.
- (Optional) Don’t select a year unless you want this seasonal address to expire and no longer automatically be set annually after a certain year.
- Click Save.
Now, every night, Salesforce NPSP will check all seasonal addresses and determine when it is the right time to make them the temporary default address or return to the normal default address.
Conclusion
Maintaining accurate addresses for your donors, partners, constituents, and volunteers is an important part of NPSP data management. By properly maintaining addresses, your nonprofit will benefit from reducing staff time, reduced expenses, and improved donor relationships.
The Salesforce NPSP offers both manual and automated address verification options. By default, NPSP uses address management features for household accounts but does not do the same for organizational accounts. However, you can change this with the proper configuration.
As you learn more about the Salesforce NPSP, get a great foundation of knowledge by focusing on the most important Salesforce NPSP training first.


